These basic triggers allow you to use the Controller's realtime and astronomical clock, digital inputs and web interface to control timeline playback and set intensity levels:
The startup trigger determines what the Controller should do after power up or reset. There are no configuration options.
A timeline starting (generally as a result of a trigger or the timeline looping) can be used as a trigger, use the configuration pane to select which timeline.
A timeline reaching the end of its programming can be used as a trigger, use the configuration pane to select which timeline. For a looping timeline, this trigger will fire every time the timeline loops.
A timeline releasing can be used as a trigger, use the configuration pane to select which timeline.
Any timeline can have one or more flags placed on the ruler (see working with timelines) to act as triggers, use the configuration pane to select which timeline and the flag within that timeline.
The Controller has an internal, battery-backed real time clock. In a project with multiple Controllers only one Controller is set as the Time Server (see Controller association), use the configuration settings to determine what sort of real time event will be matched, for example 5 minutes past every hour or at noon on a specific date.
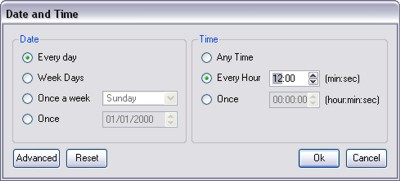
The standard dialog allows you to deal with the most common cases, including one-off events or events that recur hourly, daily or weekly. Note that the maximum resolution of real time events is 1 second, so an "Any Time" trigger will fire every second during the specified date range:
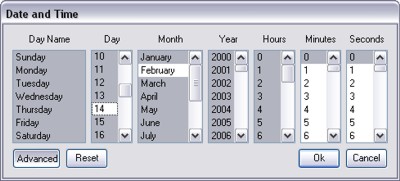
There is also an advanced dialog that allows you to specify a precise mask of when the trigger should fire, using a combination of year, month, day of the month, day of the week, hour, minute or second. Highlighted values are included in the mask and make sure all values are highlighted in any column you don't care about. The trigger will fire at all times that match the specified mask in all columns - so no column should be blank or the trigger will never match:
Further information about the use of the real time clock can be found in the conditions chapter.
In the Network view, a Controller properties option exists to "execute real time triggers on startup". This will ensure that all real time triggers are executed from a user-specified time to the current time to reinstate the correct playback state in case the Controller is restarted for some reason (eg.power loss, watchdog or remote reset).
NOTE: Real Time triggers are only tested by the Time Server and then shared over the network so any conditions are tested on the Time Server only.
The Controller is also equipped with astronomical clock algorithms which automatically generate the correct sunrise, sunset and twilight times for the location of the installation (see project properties), use the configuration pane to select between sunrise, sunset, dawn or dusk and to specify an offset, negative or positive, in minutes.
Two versions of dawn and dusk are offered, using the two definitions of twilight: civil and nautical. Please see Wikipedia for an explanation of these terms.
A Controller properties option exists to ensure that all astronomical triggers are executed from a user-specified time to the current time to reinstate the correct playback state in case the Controller is restarted for some reason (eg.power loss, watchdog or remote reset).
NOTE: Astronomical triggers are only tested by the Time Server and then shared over the network so any conditions are tested on the Time Server only.
As well as astronomical triggers the Controller uses lunar clock algorithms to calculate the lunar phases based on the location of the Controller (see project properties).
The lunar events are new moon, first quarter, full moon and third quarter. Use the configuration pane on the right to select the phase.
NOTE: Lunar triggers are only tested by the Time Server and then shared over the network so any conditions are tested on the Time Server only.
The LPC and TPC with EXT has 8 digital inputs which can be used as triggers, either to detect a voltage or a contact closure. Use the configuration pane to select which Controller (None, Any or a particular LPC or TPC with EXT), which Input (1 thru 8) and the polarity of the logic - select Low for contact closure or when driving with an "active low" signal, select High for driving with an "active high" signal.
To receive a digital input from a Pharos Remote Device, change the Device to RIO 80 or RIO 44 and set the RIO number, or leave as Any. The RIO 80 has 8 inputs and the RIO 44 has 4 inputs.
The inputs on the revised LPC and TPC with EXT hardware and the RIOs can also be configured as analog inputs - see Advanced Triggers.
This trigger type is provided for triggering from the web interface, there are no configuration options.
Starts a timeline, use the configuration pane to select which timeline.
Releases a timeline, use the configuration pane to select which timeline.
Starts a timeline if it's not running, or releases the timeline if it is.
Pauses a timeline at its current position - effects and media will also freeze, use the configuration pane to select which timeline.
Pauses all timelines at their current position - effects and media will also freeze.
Resumes playback of a paused timeline from its current position, use the configuration pane to select which timeline.
Resumes playback of all paused timelines from their current positions.
Releases all output, use the configuration pane to set a release fade time.
Sets the intensity of a group of fixtures, use the configuration pane to select the group, intensity level, fade and delay times. Because the LPCs are genuine lighting controllers as opposed to DMX framestore devices, realtime control of intensity is available at all times as it would be on a sophisticated lighting console. You can control the intensity of one or more groups of fixtures regardless of what timeline(s) they may be running.
You can think of each group as having its own intensity fader, which this action allows you to move between 100% (default) and 0%. You can specify which group to affect and the new position for the fader. It is sometimes useful to set the fader position (as a percentage) from a variable - this permits direct intensity mastering via an input such as serial, MIDI or DMX. The fade and delay times can also be set from variables.
The fader modifies the programmed intensity for all fixtures within the group. On startup all groups have their faders at 100%. Where multiple groups containing the same fixtures have their intensity reduced then the decrease is cumulative.
Note that if you decrease intensity for one group you can only increase it again by acting on the same group. Applying an increase intensity action to a different group will have no effect even if that group contains the same fixtures - you would be trying to move a different fader.
Increases or decreases the intensity of a group of fixtures, use the configuration pane to select the, group, step size (in percent), fade and delay times. Because the LPCs are genuine lighting controllers as opposed to DMX framestore devices, realtime control of intensity is available at all times as it would be on a sophisticated lighting console. You can control the intensity of one or more groups of fixtures regardless of what timeline(s) they may be running.
You can think of each group as having its own intensity fader, which these actions allow you to move between 100% (default) and 0%. You can specify which group to affect and the increment by which to change the fader position. It is sometimes useful to set the step size, fade and delay times from variables.
The fader modifies the programmed intensity for all fixtures within the group. On startup all groups have their faders at 100%. Where multiple groups containing the same fixtures have their intensity reduced then the decrease is cumulative.
Note that if you decrease intensity for one group you can only increase it again by acting on the same group. Applying an increase intensity action to a different group will have no effect even if that group contains the same fixtures - you would be trying to move a different fader.
Sets the video brightness and audio volume of the output of an AVC.